
GUIDE TO PROCESS SUCCESS (3/8)
Prepare your process hierarchy and blueprint
A ‘process hierarchy’ provides an overview of an organisation’s processes and their relationships. A ‘process blueprint’ is a template for how you create processes. Together they let you delegate work to process owners, without losing control.
The following 10 steps in your process improvement plan can be quite time-consuming. However, by preparing your process hierarchy and a process blueprint you can scope your work very well. A clear scope that is focused on what is critical to your business will help to ensure that your process improvement effort makes it to a state of continuous improvement.
- Introduction to process improvement
- Prepare a process collaboration tool
- Make a process hierarchy and a process blueprint
- Appoint, nominate and educate process owners
- Present to your colleagues
- Make process flow charts
- Stabilise your processes
- Maintain process focus
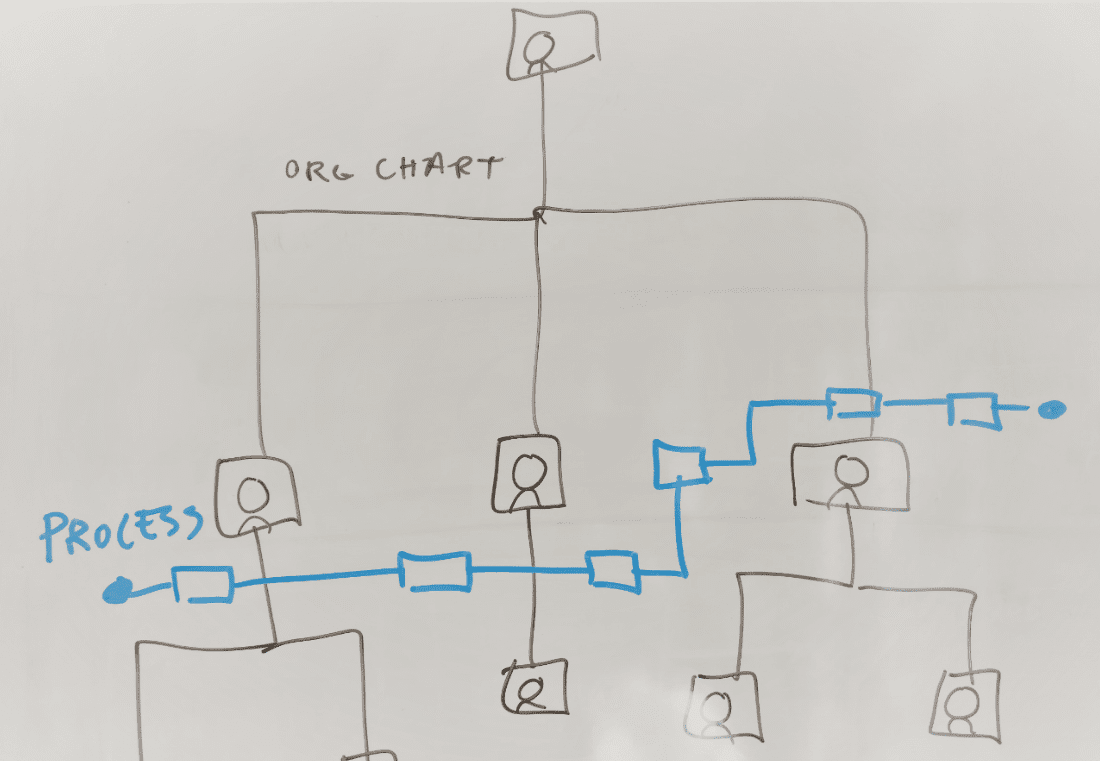
A process hierarchy supplements your org chart
It may help to view a process hierarchy* as a supplement to your organisational chart. Where the organisational chart shows how departments and roles are related, the process hierarchy shows how activities are related and how they deliver the outcomes that are needed to attain your organisation’s goals.
The selection of processes may focus on:
- Customer touchpoints – if the goal is to improve the customer experience.
- Value creation – if the goal is to streamline and eliminate waste.
- Risks – if the goal is to visualise and manage economic, market and reputational risks.
⚠️ A typical error is to map processes at the wrong levels. Some end up with processes that are so high level that no one in the organisation can use them for anything practical. Others end up with swimlane diagrams that are so detailed that they quickly become outdated and too hard to maintain. The trick is to understand which levels you can use and then design your blueprint accordingly.
*You may also know it as process architecture. Read our guide to creating a process hierarchy for specifics on this.
Business processes are the building blocks of your process hierarchy, so they’re important to know.
A quick intro to business processes
The typical distinction is between functional and end-to-end business processes. The functional business processes describe processes that exist within individual functions, for example, sales. End-to-end” business processes describe the activity flows across the organisation.
Additional types of processes (based on their role in value creation):
- Management processes. This includes processes that control the company as a system of management tasks, governance, audits, etc.
- Operating processes. Here we speak of core processes in Product Development, Manufacturing, Sales, Marketing and Distribution.
- Support processes. It could be processed across Finance, HR and IT.
Based on these three types, you can break down all your recurring tasks in processes.
Business process levels
In the Gluu platform, we work with a hyperlinking model. This allows you to connect any process, rather than having to see them as a hierarchy. However, there is a need for some hierarchy and we work with three levels:
- Process category – typically a large functional area.
- Process group – typically the domain of a team within a function.
- Process
- Activity (typically with a work instruction)
One way to show end-to-end business processes is to think of the customer’s touch points. In other words, you can show the business processes behind the customer’s first contact with your company right up until the customer relationship ends. Below is an example of what we do internally at Gluu.
Ad. 1/2: Process category with groups
The image below shows the three ‘process groups’ that divides the customer journey overall:
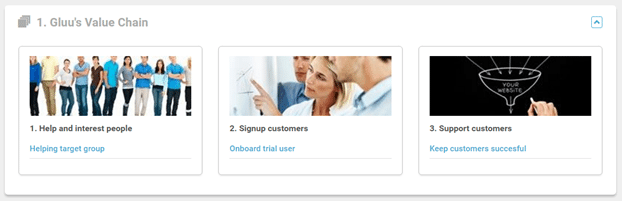
Example of a process overview that shows a high-level process relationship
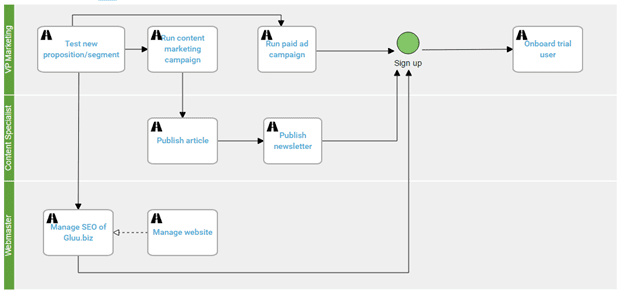
Clicking the process “Helping target group” opens a process diagram that shows how our marketing processes are related overall. This helps to scope the specific processes and clarify the overall responsibilities among executives:
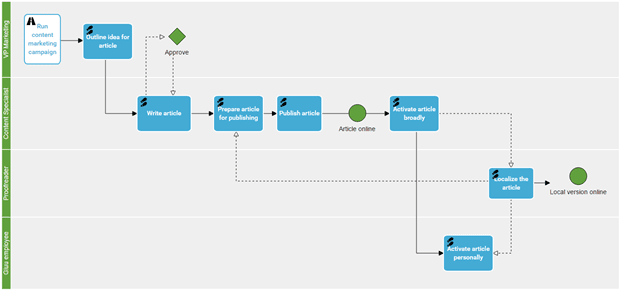
Ad. 3: Example of a single business process (created as a swimlane diagram)
A click on the process “Publish article” brings you to a diagram of the entire flow of activities that lead to a new article being published. This is the most specific process level, but underlying activities (the blue boxes) may still contain tasks that could take 1-4 hours, such as “Write an article”. The process also shows decision points, these are not hidden in the work instructions. See the example in the diagram on the next page:
Ad. 4: Activity with work instruction
Clicking the activity “Write an article” brings you to its ‘activity page’ (with work instructions, comments and tasks). It outlines the concrete steps to write an article – including how our internal tools are used. Below is an example of an activity:

Creating your process hierarchy
This was a short introduction to process types and levels. Now you need to get started!
STEP 3.1
Agree on a process naming convention
Start by agreeing on how you will name your processes. We recommend that you…
- use the imperative form so that the process becomes actionable.
- avoid names that are also department or team names, for example, “Marketing”.
- be as specific and precise as possible.
GOOD PROCESS NAMES
- Handle complaints
- Run online campaign
BAD PROCESS NAMES
- Complaints processing
- Online marketing
⚠️ Remember to avoid jargon when you need to name your process. Most important, however, is that you use the same names that your colleagues use every day – even if it includes jargon. Think of something that a new hire would be able to understand.
STEP 3.2
Agree on a convention for process ‘output’ or ‘outcomes’
Agree on a convention for output or outcomes going forward, it is important that the process names and output are managed centrally. This avoids duplication and ensures understanding and relationships across the board.
⚠️ An “output” is the outcome or deliverable that the activity should result in.
Each process and each activity have an output or outcome. If a process flow is well made, then the output from one activity is the input to the next. Thus, you will not need to describe the input.
GOOD OUTPUT DESCRIPTIONS
“Complaint case created in the system.”
“Campaign brief.”
BAD OUTPUT DESCRIPTIONS
“Customer sends a complaint to be treated by the service employee.”
“Always the best promotions”
STEP 3.3
List your end-to-end business processes
When the naming is in place, you can start listing the processes that you want to include.
Start with the critical processes, using the main flows of the company as a starting point. This is all about…
- highlighting the value-added activities in each process.
- describing “as-is” – the processes will be described in the way you believe that they are carried out today.
- finding the right process level, for example, one process should not have an activity called “Send Mail” when another is called “Deliver service.”
Example
A manufacturing company’s end-to-end process is:
- Write a contract.
- Process sales order.
- Plan production.
- Prepare the machine.
- Produce order.
- Check stock.
- Deliver to the customer.
These can be placed at the top of each group, so it is clearly visible which subprocesses (eg. “Change Material”) support them.
STEP 3.4
List other critical processes
Once the main processes have been listed, then it is time to list the critical processes that form the “building blocks”. It may cover operating, management and support processes depending on what is critical for your organisation. Below is an example of such processes divided into functional categories:

- Categories of support processes
- List all critical processes and make sure that each process has a good name and output, or dividends.
- Listing your processes gives you the “building blocks” to create an overview of how all processes are linked.
Now you have the building blocks.
STEP 3.5
Add the critical processes to the end-to-end overviews
Now you can link the different processes:
- Include all of your critical processes in your end-to-end process overviews.
- Go through each critical process and show which other processes start and end the process. The advantage is that it clearly defines the scope of each process, and makes the subsequent mapping easier.
- Use the ‘network view’ in Gluu to create an overview and ensure that all connections are clear:

You are now ready for the first draft of the process hierarchy.
⚠️ Start with the most critical processes and exclude any other. This is typically between 20 and 40 processes. It is important that the initial processes cover work for all the employees that are meant to be involved in your process work. This way everyone has a role to play. The final process hierarchy of a medium-sized company is between 100 and 200 processes.
References:
- Using Gluu’s process hierarchy
- Examples of processes
STEP 3.6
List your organisational roles
An important building block of processes are the roles that need to execute them. It is important not to confuse a role with a title. ‘Organisational roles’ represent “parts to play” in the company and each person is likely to have more than one role.
The roles must fit your processes. This means that if you only map the processes in relation to teams or job functions, then the roles describe these. Detailed processes require detailed roles.
- Make a list of the roles that you already have.
- Create a list with accompanying job description in Gluu.
- Now you have a common list of roles which your process owners can use when they need to map processes.

An example of a role described in Gluu.
Maintain your roles centrally (we recommend HR). Make sure that only they are given permission to manage roles in Gluu.
References:
- Using roles in Gluu
STEP 3.7
Creating a process blueprint
To validate the scope of the work ahead of you, it is important to map a single full process and set of work instructions. We call this a ‘process blueprint‘. A process blueprint is a template for your upcoming process mapping effort and it aligns expectations about the necessary level of detail internally and can help you to assess whether your initial scope is realistic.
The objective of this step is to create such a process blueprint that can show your future process owners what a good process looks like. A good process clarifies:
- purpose (output).
- which roles that are responsible for which activities.
- approvals and order of activities.
- exemptions (which may start related processes).
- how to carry out each activity.
The good process has between two and 10 activities. A process which has less than two tasks is an activity, not a process. Whereas ten tasks are too much for any individual process, in this case, it’s best to split them up into several processes.
Here is how you do it:
- Select a specific process for your blueprint. Find an example that everyone can relate to. It may be “Conduct client meeting” or “Onboard new colleague”. Your first process must not be too simple. But, also not too complicated.
- Map this in a workshop with your core process team.
- Be sure to use activities, links to other processes, decisions, and events. In this way, you create an example that covers many situations.
- Add work instructions to a minimum of one activity. Be specific about the use of formats, files and references to other sources.
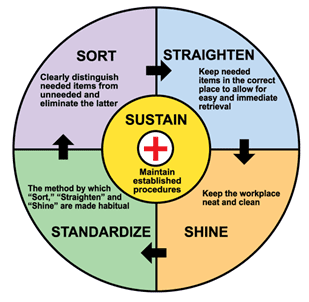
⚠️ 5S is a lean methodology that is used to organise each activity. The method aims to improve or introduce standardisation by identifying which items and/or tools are used, maintaining those items and sustaining them.
More info?
- Video: Make a good flow (12:21)
- Using Gluu for process mapping
- Using Gluu to make work instructions
- 5S implementation guide
- Clarify the process owner role
STEP 3.8
Describe the process owner role
The process owner is the “head of the process.” The process owner is typically not a specialist, but one who understands customer needs for consistency across the board. Specifying this role is part of your blueprint.
Couplings between activities and understanding of outcome (customers value).
| Functional Manager | Process owner | |
| Management | Employees of the department (direct reporting). | Employees in all departments who work in the process. |
| Knowledge | Functional specialist knowledge is shared within the department. | |
| Improvement scope | Within the department. | Across the organisation. |
Steps to take:
- Create a job description for the process owner in the format that you already use.
- Make the role of a part of your HR system and consider a special bonus or supplement.
The process owner role too often becomes yet another “hat to wear” for busy executives. If you instead give the role to the lowest level possible, then you ensure a closer connection between process and actual work.
Also, the process owner does not have to be good at updating the process (using Gluu) if he or she has a junior employee as an editor to help him.
References:
- Article: “Process Ownership – The Overlooked Driver of Sustained BPR Success,” Booz&Co (PDF)
- Video: The role of the process owner explained by Michael Hammer. (12:24)
- Article: “How a Process owner role may help break your internal silos
STEP 3.9
Get buy-in from senior management
Once you have made the first draft process hierarchy, your process blueprint and defined your process owner role, then the time has come to involve senior management. Senior management must validate the end-to-end processes, the process blueprint and their connection with the company’s strategy.
Workshop: Business model and process blueprint support
| Outcome | Top management reviews the end-to-end processes, their links and signs off on process ownership. |
| Participants | Senior management (those with overall responsibility for the process hierarchy in scope) |
| Agenda |
|
STEP 3.10
Checklist
Now, complete this checklist:
- Create, name and describe the outputs of your critical processes.
- Provide process diagrams consisting of functional processes for your end-to-end flow.
- Prepare a process blueprint of a specific end-to-end work instruction.
- Senior management must approve process hierarchies.
- All members of senior management own at least one end-to-end processes.
- Process owner’s job description and terms of reference approved by senior management.
Next step: Appoint process owners
Now that you have a process hierarchy and blueprint ready. It’s time to appoint, nominate and educate process owners. In this article, you will learn the importance of process owners and how best to assign your own.